WhatsApp Meta Developer Account Setup And WhatsApp Template Flow
Setting up Meta WhatsApp Business from scratch requires (1) a healthy personal FB account, (2) a Meta Developer + Business Portfolio, (3) a Meta App with WhatsApp product added, (4) a dedicated real phone number, (5) Display Name approval, (6) Business Verification with company documents (1–7 days), (7) a permanent System User token, and (8) webhook + templates. Plan 3–7 business days end-to-end, mostly waiting on Meta reviews. Have your business documents ready before starting.
What's required to set up a brand-new Meta WhatsApp Business integration end-to-end. Covers the developer account, business portfolio, app, phone number, business verification, tokens, webhooks, and templates.
- Layers and dependencies
Personal Facebook account (foundation)
        ↓
Meta Developer account     (free, 5 min)
        ↓
Meta Business Portfolio    (free, 10 min)
        ↓
Business Info filled in    (5 min) ── used later by Business Verification
        ↓
Meta App created           (10 min) ── WhatsApp product added
        ↓
Test phone number          ── 90 days, only whitelisted recipients
        ↓
Real phone number          (5 min + SMS code)
        ↓
Display Name approval      (1–2 business days)
        ↓
Business Verification      (1–7 business days) ⭐ REQUIRED for production
        ↓
System User permanent token
        ↓
Webhook configured
        ↓
Message templates submitted (minutes to 24h each)
        ↓
PRODUCTION READY
| Section 1 — Meta Developer & Business Account Setup |
Meta Account Setup
Layer 1 — Personal Facebook account
You need a real Facebook personal account. This is the human identity that owns everything.
- Must be a long-standing real account with normal activity (Meta blocks accounts that look fake or duplicated)
- Enable 2FA on it because everything downstream depends on it
- Don't use a throwaway account — if Meta flags it, your entire WhatsApp setup gets locked.
Layer 2 — Meta Developer account (5 min, free)
- Go to https://developers.facebook.com
- Click Get Started → log in with your personal Facebook account
- Accept Developer Terms
No payment, no verification at this stage. This is where you'll later create your Apps.
Layer 3 — Meta Business Portfolio
The business identity, separate from your personal account.
- Go to https://business.facebook.com
- Click Create Account
- Fill in:
- Business name (e.g. "Optica Moderna N.V.")
- Your name + work email (use
@yourdomain.com, not@gmail.com— Meta is stricter on free-email accounts)
Layer 4 — Business Info inside the Portfolio
Business Portfolio → Settings → Business Info — fill in everything:
| Field | Why it matters |
|---|---|
| Legal business name | Must match incorporation docs |
| Business address | Must match utility bills / business registration |
| Phone number | Should ring at the business |
| Website | Must be live; Meta verifies it exists |
| Business email | Used for verification correspondence |
| Time zone, currency, industry | Standard |
Business Verification (section 9) will check these match your supporting documents. Get them right from the start to avoid rejection cycles.
Layer 5 — Create a Meta App
Back in https://developers.facebook.com:
- My Apps → Create App
- App type: Business (not Consumer)
- Display name + contact email
- Link to your Business Portfolio (created in Layer 3)
- Add the WhatsApp product to the app
Meta automatically creates:
- A WhatsApp Business Account (WABA) linked to your Business Portfolio
- A Test phone number (US-based, free, 90-day test send limit, ~5 whitelisted recipients)
- A temporary access token (24-hour lifetime)
You can start exploring the WhatsApp API immediately with the test number.
Layer 6 — Add your real phone number
The phone that will actually send/receive messages in production.
Requirements for the phone number:
| Requirement | Why |
|---|---|
| Not currently registered on WhatsApp (regular or Business) | If it is, delete the existing WhatsApp account first |
| Can receive SMS or voice call | For Meta's verification code |
| Can ring during business hours | Meta may call to verify ownership |
| You own/control it | Don't use a customer's or partner's number |
Process: Meta Developer Console → WhatsApp → API setup → Add phone number → enter country + number → receive verification code → enter code → registered.
Layer 7 — Display Name approval
After registering the number, submit the Display Name that customers see in WhatsApp (e.g. "Optica Moderna").
- Submit via WhatsApp Manager
- Meta reviews for impersonation / misleading names
- Approval takes 1–2 business days
- Until approved, customers see only your phone number, not your business name
Layer 8 — Business Verification ⭐ (REQUIRED FOR PRODUCTION)
Yes, business verification is mandatory. Without it:
- ❌ Can only send to ~50 phone numbers per day
- ❌ Limited to test phone numbers
- ❌ Can't get System User tokens with messaging permissions
- ❌ Customer-facing display name shows as "unverified business"
Business Portfolio → Settings → Business Info → Start Verification.
9a. Documents Meta will ask for
| Document | Example |
|---|---|
| Proof of business existence | Business registration / certificate of incorporation |
| Proof of business address | Recent utility bill / lease / bank statement (<90 days old) |
| Proof of legal name | Tax registration / VAT certificate / similar government doc |
| Domain ownership (sometimes) | DNS TXT record OR file uploaded to your website root |
9b. What gets checked
- Your business actually exists (not a shell)
- Address on documents matches what you entered in Business Info
- Website domain associated with this business
- Optionally a phone call to your listed business number
9c. Timeline
- Submit docs → review takes 1–7 business days
- If rejected, you get told why; you can re-submit corrections
- Common rejection reasons: address mismatch, document >90 days old, business name on doc doesn't match registered name in Business Info
Layer 9 — System User + permanent token
- After business is verified, generate a token that never expires (don't keep using the 24-hour dev console token).
- Business Settings → System Users → Add new
- Assign the new System User to the WhatsApp Business Account with appropriate permissions
- Click your system user → Add Assets → Apps → select your app → Full Control → Assign. Add Assets again → WhatsApp Accounts → select your WABA → Full Control → Assign.
- Generate token → expiration: Never
- Select permissions:
whatsapp_business_messagingwhatsapp_business_management
- Copy the token — this is the value that goes into Odoo's Settings → WhatsApp Cloud API → Access Token
Layer 10 — App Review (sometimes required)
If the Meta app is in Development mode:
- You can only message users explicitly added as "test users"
- For production, toggle to Live mode (top of Developer Console)
- For certain permissions, Meta does an "App Review" where you explain how you use them
- For pure WhatsApp messaging (no Facebook Login etc.), App Review is often NOT needed once business is verified
Layer 11 — Webhook configuration
So Meta can notify you about incoming messages and status updates:
- Developer Console → WhatsApp → Configuration → Webhooks
- Callback URL — your publicly reachable HTTPS endpoint (e.g.
https://yourdomain.com/whatsapp/webhookfor the Got2 stack — provided bygot2_wa_discussmodule) - Verify Token — any string you choose; must match what's set in Odoo's settings
- Click Verify and Save — Meta does a GET to your URL with
?hub.mode=subscribe&hub.verify_token=<your-token>&hub.challenge=<random>and expects you to echo back the challenge with status 200 - Subscribe to webhook fields:
- messages — incoming messages from customers
- message_template_status_update — template approval changes
Meta REQUIRES HTTPS for webhooks. No HTTP, no localhost. Use ngrok or a real server.

Layer 12 — Message Templates
- Go to https://business.facebook.com/
- Click on the WhatsApp Manager.
- Click on the Template library

- Use any existing template that Meta will approve within some time.

- Click on the Customize template

- Fill in: Name = send_pos_receipt_pdf · Category = Utility · Language = en_US.
- Body: Hello! Here is your order receipt from {{1}}. Order No: {{2}} | Date: {{3}} | {{4}} | Total: {{5}}. Thank you for shopping!
| Variable | Maps To | Example |
| {{1}} | Company name | My Company |
| {{2}} | POS Order number | pos/0097 |
| {{3}} | Order date/time | 2026-04-08 14:50 |
| {{4}} | Items + qty + price | 1 x PRD1 = 22.00 |
| {{5}} | Total with currency | Total Amount: 25.30 |

- Click Submit for Review.
To avoid rejection cycles, prepare these up front:
- Business registration certificate (incorporation / commercial register / etc.) — current, official
- Recent utility bill or bank statement in business name (<90 days old)
- Tax registration document with business legal name
- Working business website with business name + address listed
- Business email at your domain (e.g.
accounts@yourbusiness.com)
- Phone number exclusively yours, not on WhatsApp anywhere
- Display Name proposal — 2–3 options ranked, in case the first gets rejected
Common gotchas
| Pitfall | How to avoid |
|---|---|
| Personal FB account looks "low quality" | Use a long-standing real account |
| Address on docs ≠ Business Info | Carefully copy from utility bill, not memory |
Business email is @gmail.com |
Use @yourbusiness.com — stricter on free-email |
| Phone number already on WhatsApp | Delete existing WhatsApp account first (Settings → Account → Delete My Account) |
| Trying to send from test phone to non-whitelisted numbers | Either add recipients to allowed list OR use a real verified number |
| Confusing token types | Don't use the 24h dev console token in production. Generate a System User permanent token after verification |
| Webhook URL is HTTP, not HTTPS | Meta rejects HTTP outright |
| Two customer instances sharing one Meta App | Meta allows only one Callback URL per app — needs one app per Odoo instance |
What ends up in Odoo
After this whole flow, Odoo's Settings → General → WhatsApp Cloud API needs THREE values:
| Field | Where it came from |
|---|---|
| Phone Number ID | Developer Console → WhatsApp → API setup → "Phone Number ID" beside your registered number |
| WhatsApp Business Account ID | Business Settings → WhatsApp Accounts → click the account → ID at the top |
| Permanent Access Token | The token generated for your System User (Layer 9) |
Plus, in the Webhook Configuration section, Odoo auto-generates:
- Webhook URL —
https://<your-domain>/whatsapp/webhook(don't edit; reflect yourweb.base.url) - Verify Token — random string, paste into Meta Developer Console → Webhooks

POS Receipt Whatsapp Module (got2_pos_whatsapp)
This module adds a Send WhatsApp Receipt button to the POS payment screen. After payment is validated, the cashier can tap the button to send the customer a WhatsApp message containing the receipt details and an attached PDF. It can also be set to send automatically.
| Field | Value | Source |
| Phone Number ID | 989231980947596 | API Setup → From → Phone Number ID |
| Access Token | EAAxxxxx... (permanent) | Business Settings → System Users → Generate |
| Business Account ID | 1465095455170107 | API Setup → WABA ID |
| Default Country Code | 1 | Enter manually |
|
|
|
|

| My Company |
Enable WhatsApp Receipts on POS Terminal
- Go to Settings → Point of Sale → select your POS config.
- Scroll to the WhatsApp Receipts section.
- Toggle Enable WhatsApp Receipts = ON.
- Select Receipt Template from dropdown (only Approved templates appear).
- Choose Send Format: Text Message or PDF Attachment.
- Optionally, enable Auto Send WhatsApp for automatic sending. Here, the receipt will be sent automatically after clicking Validate Payment in the POS.
- Click Save → restart the POS session.


- After validating the payment, Customer will receives template message + PDF on WhatsApp. After that, you can also send the receipt manually by clicking the Re-send WhatsApp Receipt button, and the receipt will be sent to the patient again.(Here the time and date will also displays).
-

- For Manual sending of the receipts you just need to uncheck the checkbox for Automatic Receipt WhatsApp.
- For this scenario, after validating the payment, you will be able to see a page that has a Send WhatsApp Receipt button.
-
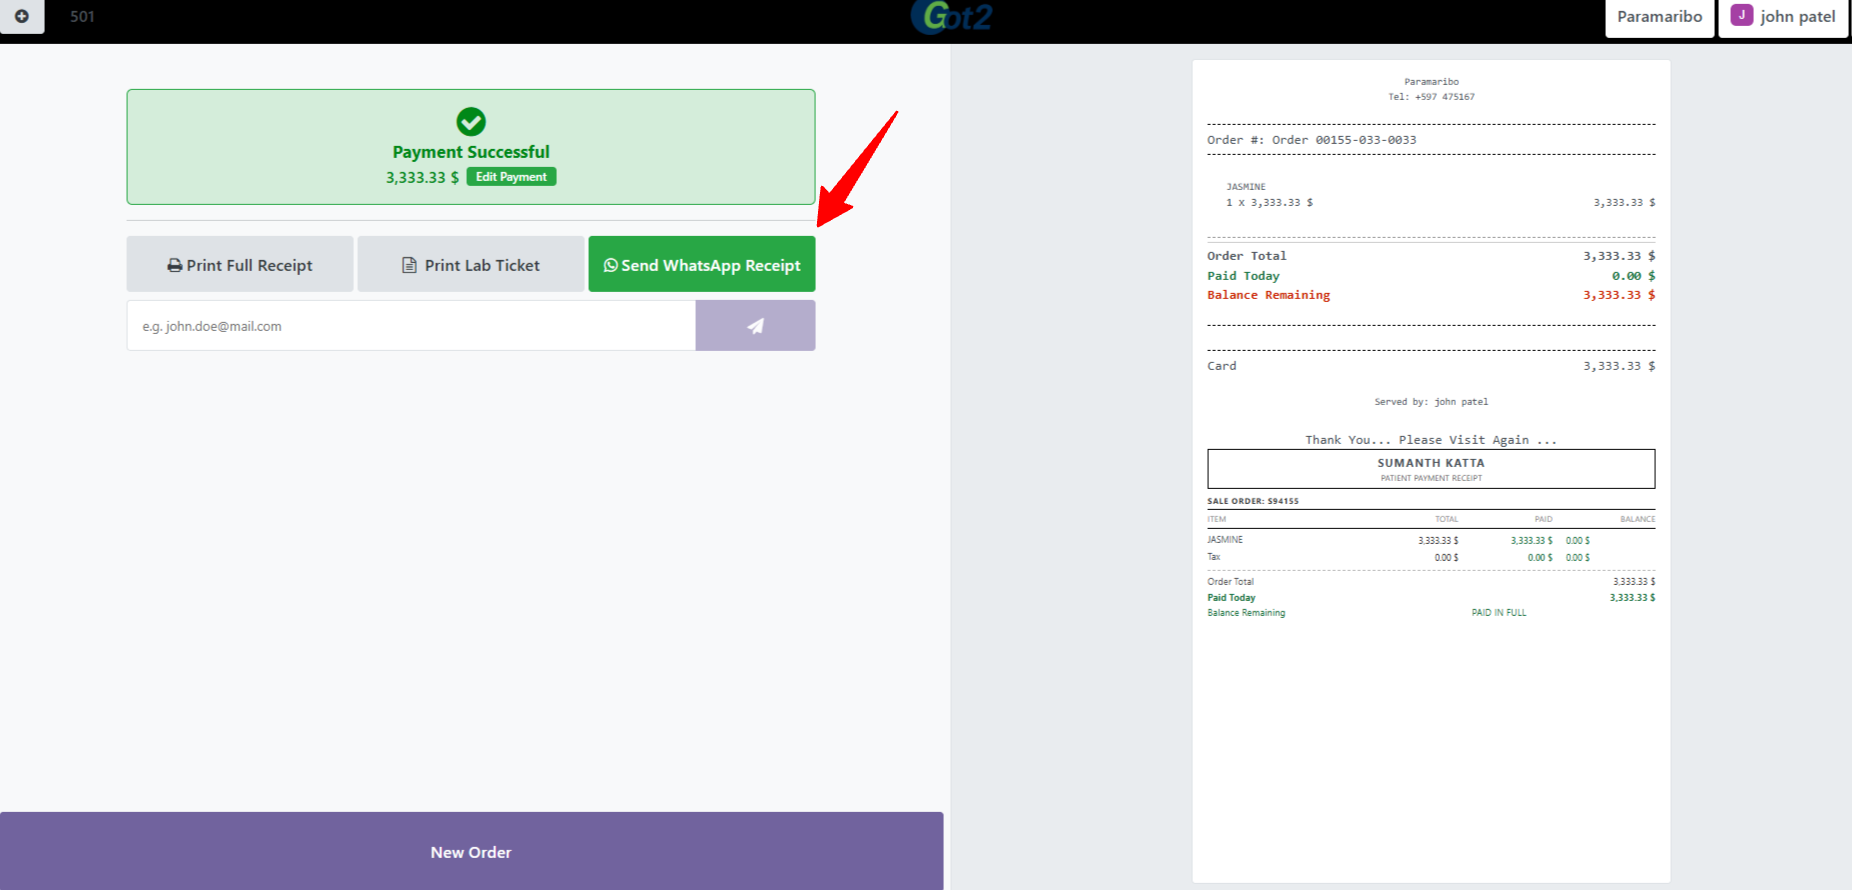
- By clicking this button, the receipt will be sent to the Customer. After that, you can also send the receipt again by clicking the Re-send WhatsApp Receipt button. The date and time at which the receipt was sent will also be displayed here.


| MODULE got2_wa_discuss — Two-Way Messaging in Discuss |
WhatsApp Chat Discussion Integration (got2_wa_discuss)
This module enables two-way WhatsApp messaging directly inside Discuss module. When a customer sends a WhatsApp message to your business number, a dedicated channel (WA: CustomerName) is automatically created in Discuss. Staff can reply and the customer receives it on WhatsApp.
How It Works
|
Customer sends "Hi" on WhatsApp ↓ Meta sends POST to your webhook URL Odoo webhook controller receives the message ↓ got2_wa_discuss creates / finds discuss.channel "WA: CustomerName" Message appears in Odoo Discuss — staff replies ↓ Reply sent back to customer WhatsApp via API |
Discuss Channel View — Live Screenshot
|
|

▲ got2_wa_discuss: WA channels in Discuss — WA: Cust, WA: Katta, WA: sumanth, WA: Vipul
Each customer gets their own dedicated WhatsApp channel (WA: name) in the Discuss sidebar. The conversation is bi-directional — messages from the customer appear in the channel, and replies from staff are delivered to the customer's WhatsApp.
5.3 Configuration Steps
|
1 |
Install got2_wa_discuss module |
- Go to Settings → Apps → Update Apps List.
- Search for "WA Discuss" or "got2_wa_discuss" → Install.
|
2 |
Configure API credentials (same as got2_pos_whatsapp) |
- Settings → Meta WhatsApp → enter Phone Number ID, Access Token, WABA ID.
|
3 |
Start ngrok and configure webhook in Meta |
If you are using local enviornmenet then in terminal
ngrok-v3-stable-windows-amd64\ngrok.exe config add-authtoken<Your ngrok token>
a. After this expected output is
AUTH token saved to configuration file:
b. Then in the same terminal run this command
ngrok-v3-stable-windows-amd64\ngrok.exe http 8070
c. Then copy the URL and paste it into Odoo.
- For this, open Settings >> Webhook Configuration. In the Callback URL, add the URL here and click Generate Token. Then copy both of these credentials.
- Now Open Meta Developers → Your App → WhatsApp → Configuration → Edit.
- Callback URL: https://YOUR-NGROK-URL/whatsapp/webhook
- Verify Token: got2secret (or whatever you set in Odoo).
- Click Verify and Save → Subscribe to:
messagesandmessage_template_status_updatefields.

- Then click and verify and save.
|
4 |
Test incoming message |
- Send a WhatsApp message from any allowed-list number to your business number.
- Open Odoo → Discuss — a new channel "WA: [sender name]" should appear.

- Type a reply in Odoo → the customer receives it on WhatsApp.
Channel Naming Convention
| Channel Name | Meaning |
| WA: Sumanth | WhatsApp conversation with contact "sumanth" — matches customer name in Odoo Contacts |
| WA: Cust | WhatsApp conversation with contact "Cust" — created auto from incoming message |
| WA: Katta | WhatsApp conversation with contact "Katta" |
| WA: Vipul | WhatsApp conversation with contact "Vipul" |
- Now, all receipt-sending logs and chat conversations are being captured, and you can view them in the WhatsApp tab of the patient form.

- Now, click on any record, and a wizard will open that includes all the data sent to the customer, along with the message body and the PDF attached to the receipt. It also contains Send Details and Order Details. By clicking the View Receipt PDF button, a PDF will open showing the receipt received by the customer.


- If the customer sends a message, a channel will be created in the Discuss module and also in this WhatsApp tab. By clicking the green-colored Open Chat in Discuss button, the chat will open in the Discuss module.


- If any conversation happens between the customer and the user, that chat history will be displayed below in the WhatsApp tab.

Customer Phone Numbers
Setting Phone Number on Customer Record
- Go to Customer→ search and open the Customer.
- Click Edit → fill Mobile field
- Based on the default country code provided in settings, it will be displayed automatically here. For example, if you type
8019185434, it will automatically format it as+1 (801) 918-5434. - If you enter +18019185434 then it will also save as
+1 (801) 918-5434and reciept will be sent to this number. - Click Save.
Test Mode Restriction — 5 Number Limit
| ✕ In test mode, Meta only allows sending to 5 pre-approved numbers. Error #131030 = "Recipient not in allowed list". To fix: Meta Developers → API Setup → To dropdown → Manage phone number list → add the number. |
| Mode | Behaviour |
| Test mode (now) | Max 5 recipients · numbers must be pre-approved · OTP verification required |
| Production mode | Any customer number worldwide · no restrictions · add payment method + verify business |
| Section 7 — Troubleshooting & Error Reference |
7. Troubleshooting
| Error / Symptom | Code | Fix |
| WhatsApp button not showing | — | Enable WhatsApp Receipts = ON in POS Config. Restart POS session. Clear browser cache. |
| Button is grey | — | Customer has no phone number. Contacts → add Mobile with country code. |
| Access denied in logs | 403 / #131005 | System User missing WhatsApp Account asset. Business Settings → reassign. |
| Invalid token | 401 / #190 | Token expired or wrong. Generate new permanent token from System Users. |
| Recipient not in list | 400 / #131030 | Test mode. Add number to allowed list OR go to production. |
| Webhook not receiving | — | ngrok not running or URL changed. Restart ngrok, update Meta webhook URL. |
| WA: channel not created | — | Webhook not verified. Check Verify Token matches in Meta and Odoo. |
| Template not in dropdown | — | Template not Approved. Settings → Message Templates → Refresh Status. |
| TEMPLATE STATUS: 404 | 404 | Phone Number ID is wrong. Double-check from API Setup → From section. |
Reading the Error Logs
|
# Tail logs in real time: tail -f /var/log/odoo/odoo.log | grep -i whatsapp # What each status means: TEMPLATE STATUS: 200 → SUCCESS — message delivered to Meta TEMPLATE STATUS: 400 → Bad request (recipient not in list / bad phone format) TEMPLATE STATUS: 401 → Token invalid or expired TEMPLATE STATUS: 403 → Access denied (System User permission issue) TEMPLATE STATUS: 404 → Wrong Phone Number ID # Webhook verification in logs: INFO Webhook verified successfully INFO Incoming WA message from 917702607264 — channel WA: sumanth created |
| Section 8 — Complete Configuration Checklist |
Checklist Before Go-Live
| MODULE Meta / Business Account |
| ✓ | Task |
| ☐ | Meta Developer account created |
| ☐ | WhatsApp Business App created and product added |
| ☐ | Phone Number ID and WABA ID noted |
| ☐ | Real business phone number added and OTP verified |
| ☐ | Business verification started |
| ☐ | Payment method added to WhatsApp account |
| MODULE System User & Token |
| ✓ | Task |
| ☐ | Admin System User created in Business Settings |
| ☐ | App assigned to System User — Full Control |
| ☐ | WhatsApp Account assigned to System User — Full Control |
| ☐ | Permanent token generated (expiry: Never) — copied and stored securely |
| ☐ | Token entered in Odoo Settings → Meta WhatsApp → Access Token |
| MODULE got2_pos_whatsapp |
| ✓ | Task |
| ☐ | Module installed in Odoo 18 |
| ☐ | Phone Number ID, WABA ID, API Version entered and saved |
| ☐ | Message template created (Category: Utility) and status = Approved |
| ☐ | Enable WhatsApp Receipts = ON in POS config |
| ☐ | Approved template selected in Receipt Template dropdown |
| ☐ | Customer mobile numbers added with country code in Contacts |
| ☐ | Test order placed → TEMPLATE STATUS: 200 → receipt received on phone |
- "Automatic Receipt WhatsApp" setting in POS → Bills & Receipts (enabled by default).
If Checked WhatsApp receipts are sent automatically in the background after payment validation (so the cashier doesn’t have to wait).
- Country code handling: the system first uses the contact’s country code; if not available, it falls back to the global setting in Integrations (using the Meta WhatsApp Cloud API).
For manual settings, a default country code of 1 is provided. You can change this as needed, and the system will handle it automatically from the backend—no need to include the country code in the customer’s phone number.
- Manual "Send WhatsApp Receipt" button is still available and works from the receipt screen.